powershell entra-id entra-id-governance maester extending HR Provisioning Tests with Maester: A Non-Invasive Approach
- Pre-requisites installation
- Test cases definition
- Executing tests via Maester
- Test results in Maester
- Next steps and plans
Last year, I shared insights on unit testing HR-driven provisioning rules. Initially, this was more of an academic exercise, but it garnered positive feedback and even some requests to integrate the tests into Maester.
Inspired by a recent blog post by Suryendu Bhattacharyya, which explored how such an integration could be feasible, I decided to enhance the HRProvisioningTests PowerShell module by adding non-invasive support for Maester.
In this blog post, I’ll walk you through the process, covering the following key aspects:
- Maester installation and HRProvisioningTests installation.
- A quick recap on test cases definition.
- Connecting to Microsoft Graph and executing the tests via Maester.
- A brief overview of test results.
- Next steps and plans?
Pre-requisites installation
First you need to install the Maester and HRProvisioningTests PowerShell modules.
Installing Maester
Maester installation is thoroughly documented in installation guide. The easiest approach is to install it directly from the PowerShell Gallery using the following command::
Install-Module Pester -SkipPublisherCheck -Force -Scope CurrentUser
Install-Module Maester -Scope CurrentUser
You should also create a local test repository:
# choose a more persistent path :)
mkdir c:\temp\maester-tests
Install-MaesterTests -Path C:\temp\maester-tests\
This command will create a repository on your local machine. We will use it to store our custom tests for HR provisioning testing.
Installing HRProvisioningTests
Next, install or upgrade the HRProvisioningTests module to the latest version with Maester support:
Install-Module -Name HRProvisioningTests -Scope CurrentUser
If you already have the module installed and want to ensure you’re using the latest version, run:
Update-Module -Name HRProvisioningTests
It is a good idea to close the PowerShell console after installing the modules. Sometimes, version conflicts can occur, causing unexpected errors when connecting immediately after installation. Restarting the PowerShell console ensures a clean environment and minimizes the risk of such issues.
Test cases definition
I’ve already described the concepts in the HRProvisioningTests test cases definition. Not much has changed since then. You still need to:
- Gernerate test suite,
- Modify the JSON data structures and define input data.
Test suite creation
After you installed the pre-requisites you need to sign-in to Microsoft Graph.
Connect-MgGraph -Scopes "Synchronization.Read.All"
Next you generate the test suite collection:
Import-Module HRProvisioningTests
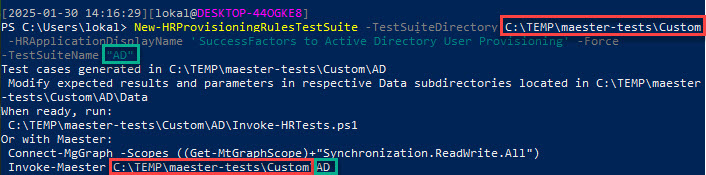
New-HRProvisioningRulesTestSuite -TestSuiteDirectory C:\TEMP\maester-tests\Custom -HRApplicationDisplayName 'SuccessFactors to Active Directory User Provisioning' -Force -TestSuiteName "AD"
Two new parameters were included in New-HRProvisioningRulesTestSuite since v1.0.0.
| Switch | Description |
|---|---|
Force |
Deletes all custom generated tests under the path were you want to store the new version of tests. Use with extreme caution |
TestSuiteName |
Short name for test suite catergory in Maester, this category is used in tag definition and directory naming. I suggest using a really short name such as AD or JIRA. |
This will generate the test suite and store it in the directory C:\TEMP\maester-tests\Custom\<TestSuiteName> e.g. C:\TEMP\maester-tests\Custom\AD.
Modifying the test JSON data structures
We need to prepare test cases in the same way as before.
The only difference in the generated test suite is that test cases are now named
using numeric identifiers only. For example, case01.json has been replaced with
001.json, case02.json with 002.json, and so on.
As a result, the directory structure remains unchanged.
Invoke-HRTests.ps1
+---Config
| config.json
+---Tests
    +---givenName
    | givenName.tests.ps1
    | +---Data
    | 001.json
    | 002.json
    |
    +---sAMAccountName
    | sAMAccountName.tests.ps1
    | +---Data
    | 001.json
    | 002.json
    |
    +---sn
    | sn.tests.ps1
    | +---Data
    | 001.json
    | 002.json
    ...
In this directory structure, you need to:
- Remove any unnecessary subdirectories in the
Testsdirectory that are not relevant to your testing. E.g. if you do not wish to testgivenNameattribute flow, you just need to delete the directory. - Add, remove, or modify JSON files inside the Data directories to define your test cases as needed.
An example follows:
{
    "TargetAttributeName":  "givenName",
    "Description":  "When name contains diacritics it should be removed.",
    "ExpectedResult":  "Something-like-cstzrl-etc...",
    "Expression":  "NormalizeDiacritics([firstName])",
    "InputAttributes":  {
                            "firstName":  "Something-like-čšťžřľ-etc..."
                        }
}
Based on those JSON files, the actual data-driven tests are generated and executed.
When generating the test cases, these attributes are important and used within Maester integration and are used for tests description and tagging.
| Attribute/Parameter | Used in Maester tag | Used in Maester test name | Source |
|---|---|---|---|
| TargetAttributeName | Yes | Yes | JSON data file contents, e.g.
{
    "TargetAttributeName":  "givenName",
    ...
}
|
| Description | No | Yes | JSON data file contents, e.g.
{
    ...
    "Description":  "Diacritics removal.",
    ...
}
|
| Case-Id | No | Yes | JSON data file name without json suffix: 001.json the 001 will be used. |
| Test cases short name | Yes | Yes |
New-HRProvisioningRulesTestSuite -TestSuiteName AD .... The AD is used as test cases short name. |
Executing tests via Maester
Enough of preparations and theory, let’s dive into action! ![]()
To run the tests within the Maester framework, you need to:
- Connect to Microsoft Graph
- Execute the tests
Connecting to Microsoft Graph with Maester and HRProvisioningTests permissions
Running provisioning tests requires Synchronization.ReadWrite.All
permission. This permission is however required by Maester. Therefore for
Maester connection you need to run following:
Connect-MgGraph -Scopes ((Get-MtGraphScope)+"Synchronization.ReadWrite.All")
Executing the HRProvisioningTests suite
To run the tests you should execute Maester with the path to the custom generated test suite.
Invoke-Maester C:\TEMP\maester-tests\Custom\AD
You can run only specific Maester tests by using tags. This concept is also supported by HRProvisioningTests module. Few examples follow.
# to run all provisioning tests
Invoke-Maester C:\TEMP\maester-tests\Custom\ -Tag HR
# to run only provisioning tests from 'AD' test suite related to 'displayName' attribute
Invoke-Maester C:\TEMP\maester-tests\Custom\ -Tag AD.displayName
Test results in Maester
Now, we can review the results of our work. ![]()
Maester generates nice HTML based reports and HRProvisioningTests takes advantage of this if you provide good input data. Crucial for correct output of the tests is the JSON file definition especially good and concise description.
Maester generates detailed HTML reports, and HRProvisioningTests leverages these reports when provided with accurate input data. A key factor for generating correct test results is the proper definition of the JSON file, particularly with clear and concise descriptions.
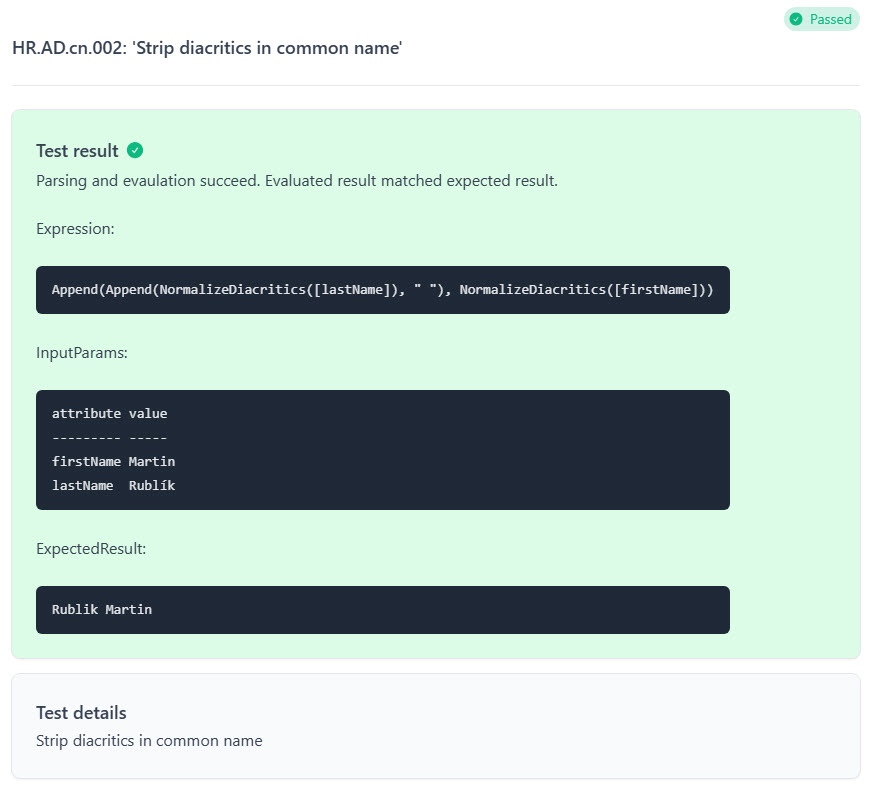
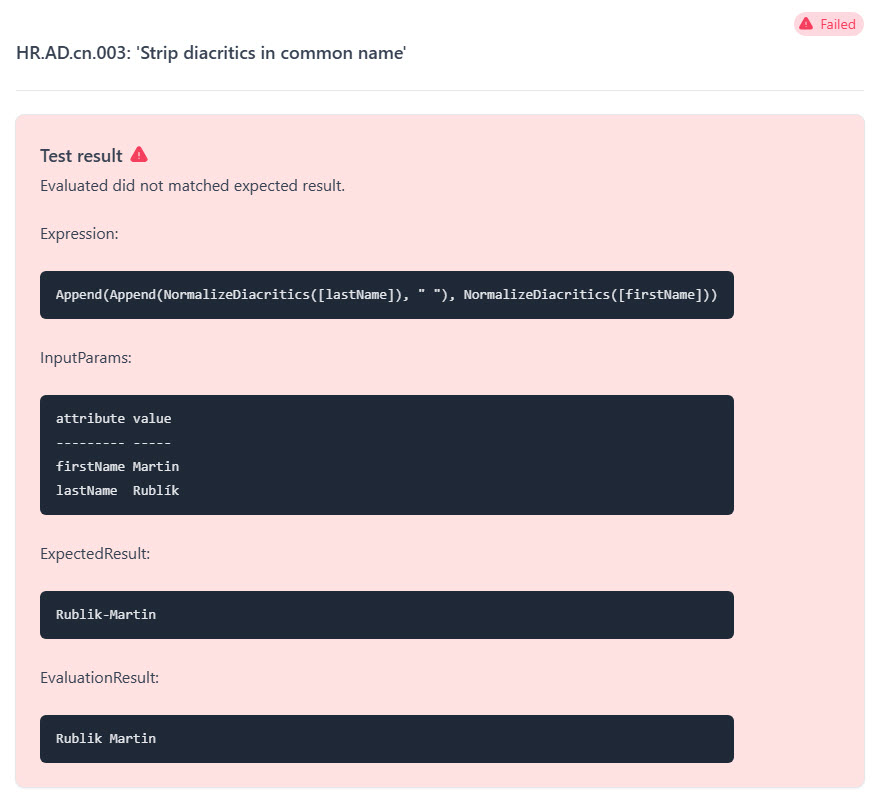
A picture is worth a thousand words. The following images show the passed and failed tests, along with important annotations.
General test overview

Passed test
Failed test - unexpected result
Failed test - evaluation error

Next steps and plans
The goal of this exercise was to shift the provisioning tests from a simple proof-of-concept to more useful concept which can benefit from Maester test framework.
I can imagine a more invasive approach when integrating with Maester. It might be nice to bundle the HRPRovisioningTests directly into the Maester which could bring more benefits such as:
- Better user experience when running Connect-Maester.
- Simplified test generation.
- Support for GraphObjects in Add-MtTestResultDetail.
So that’s it, well, till next time.