powershell entra-id entra-id-governance unit testing your HR driven provisioning rules
- Extracting the attribute mappings from the provisioning schema
- Test cases generation approach
- Tests generation and execution
Recently, my colleague needed to test a complex HR provisioning rule.
He had all the necessary inputs, e.g.:
- the formula definition,
- the respective attributes and their values,
- expected results.
I provided some assistance during the testing and formula definition.
Initially, we tested using the built-in Expression Builder, which is a helpful tool for debugging and testing formula definitions. However, it’s not designed for automation, which is essential for efficient testing. Therefore, we transitioned to the second phase.
In the second phase, we utilized the Graph API to automate the tests and programmatically compare the actual and expected results. Similarly to my earlier post, we used Graph X-Ray to identify the cmdlet that could be used for test automation:
Invoke-MgParseServicePrincipalSynchronizationTemplateSchemaExpression
We stopped there, but we can take it a step further. In this post, I’ll outline how you can use Pester - the test framework for PowerShell - to build a comprehensive test suite for your HR-driven provisioning rules.
I’ll describe:
- How to extract the attribute mappings from the provisioning schema.
- How I approached test cases generation and how you can do the same.
- How to execute and evaluate the tests.
If you just want to see the results and get things going jump directly to the last part of the post.
Extracting the attribute mappings from the provisioning schema
To extract the attribute mappings, you can simply download the schema and navigate through the JSON schema object. Below are some screenshots/commands for reference:
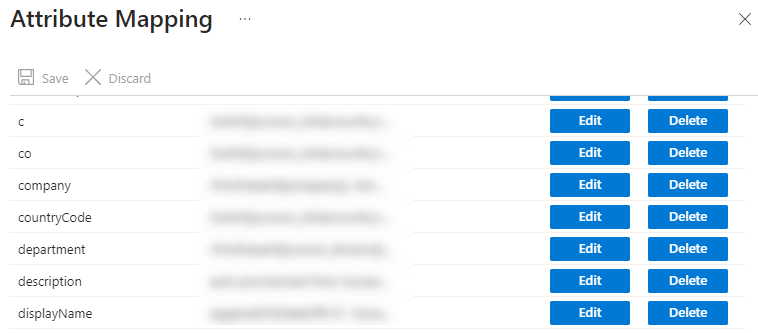
To better illustrate the steps, consider we have following attribute mappings defined for HR based provisioning:
Note: Not all attribute mappings are present in the picture.

You can retrieve the provisioning schema using the following PowerShell commands:
Connect-MgGraph -Scopes "Synchronization.Read.All"

# Searching for servicePrincipalId
$servicePrincipalId =  Get-MgServicePrincipal -Filter "displayName eq 'SuccessFactors to Active Directory User Provisioning'" | select -ExpandProperty Id
# Searching for synchronization job
$synchronizationJob = Get-MgServicePrincipalSynchronizationJob -ServicePrincipalId $servicePrincipalId
# get the schema
$synchronizationJobSchema = Get-MgServicePrincipalSynchronizationJobSchema -ServicePrincipalId $servicePrincipalId -SynchronizationJobId $synchronizationJob.Id
Attribute mappings (for SuccessFactors provisioning app) were present here:
$synchronizationJobSchema.SynchronizationRules[0].ObjectMappings[0].AttributeMappings

BEWARE
Please double-check the JSON path, as it may vary depending on the source HR directory and the types of objects supported for synchronization. As far as I know, only user objects are currently supported for synchronization in HR based provisioning.
TargetAttributeName and Source are the most interesting
parts in the Attribute mappings.
Test cases generation approach
For test creating a test suite we need:
- the functions / attribute mappings that we want to test,
- the inputs (HR source attributes) used in the attribute mappings,
- the tests definition, along with necessary configurations.
We already described how to extract the attribute mappings from provisioning schema. Now, we describe how to gather the inputs (HR source attributes) and how to wrap it all in test suite generation.
Enumerating source attributes and test data template generation
To identify HR source attributes used in attribute mappings, you’ll need to
parse the Expression in the Source attribute mappings schema.
For example, in givenName attribute mapping, we remove the diacritics via
NormalizeDiacritics
function which is parameterized by firstName attribute coming from
SuccessFactors.

Parsing the expression properly, would involve using techniques from my compiler lectures taken long time ago during my computer science undergrad (CS) days. I opted for a quicker approach. Instead, I employed a regex to extract the variables from the functions.
Attributes are typically enclosed in brackets e.g. [attributeName]. We can use
a simple regex \[[a-zA-Z0-9_]+\]to extract them.
Once we have extracted the attributes, we remove the leading and trailing brackets and then sort the attributes to ensure we have only unique occurrences.
The extracted attributes can then stored in a custom object named
$testRuleData, which we will serialize later as JSON for use in our test
cases. This structure will be used as generic template which we will need to
fill in after test cases are auto-generated.
The following code snippet iterates over the attribute mappings, searches for HR
input attributes and prepares the testRuleData JSON structure.
$regex=new-object System.Text.RegularExpressions.Regex("\[[a-zA-Z0-9_]+\]")

$testRuleData=@()
foreach($rule in $syncrhonizationJobSchema.SynchronizationRules[0].ObjectMappings[0].AttributeMappings)
{
    # BEWARE: we generate test cases only for functions
    #   maybe it would be nice to include others (constants and attributes) as well, but it is currently out-of-scope
    if ($rule.Source.Type -eq 'Function')
    {
        $targetAttributeName=$rule.TargetAttributeName.ToString()

        # get all regex matches
        $attributes=$regex.Matches($rule.Source.Expression) | select -ExpandProperty Value | %{$_.Trim('[').Trim(']')} | sort -Unique
        $attributesHT=new-object pscustomobject
        foreach($attr in $attributes)
        {
            $attributesHT | Add-Member -NotePropertyName $attr -NotePropertyValue "Please-Fill-In"
        }

        $testRuleData+=[pscustomobject]@{
            'TargetAttributeName'=$targetAttributeName
            'Description'='Please-Fill-In'
            'ExpectedResult'="Please-Fill-In"
            'Expression'=$rule.Source.Expression
            'InputAttributes'= $attributesHT
        }
    }
}
The testRuleData structure is straightforward.
Let’s consider the earlier example with NormalizeDiacritics.
In this case the generated (based on schema) JSON would look like this:
{
    "TargetAttributeName":  "givenName",
    "Description":  "Please-Fill-In",
    "ExpectedResult":  "Please-Fill-In",
    "Expression":  "NormalizeDiacritics([firstName])",
    "InputAttributes":  {
                            "firstName":  "Please-Fill-In"
                        }
}
To successfully describe our test case, we need to slightly modify it after generation.
{
    "TargetAttributeName":  "givenName",
    "Description":  "When name is 'Lukáš'",
    "ExpectedResult":  "Lukas",
    "Expression":  "NormalizeDiacritics([firstName])",
    "InputAttributes":  {
                            "firstName":  "Lukáš"
                        }
}
With the generic templates prepared, we are almost ready to generate the entire test suite.
Test cases definition approach
Best approach to unit testing your HR provisioning synchronization rules is to use data driven
tests. We’ll use the testRuleData
structures generated in previous step and feed it into Pester tests.
I won’t delve into the details of Pester here deeply. There are
better
resources and more knowledgeable individuals
available for that topic ![]() .
.
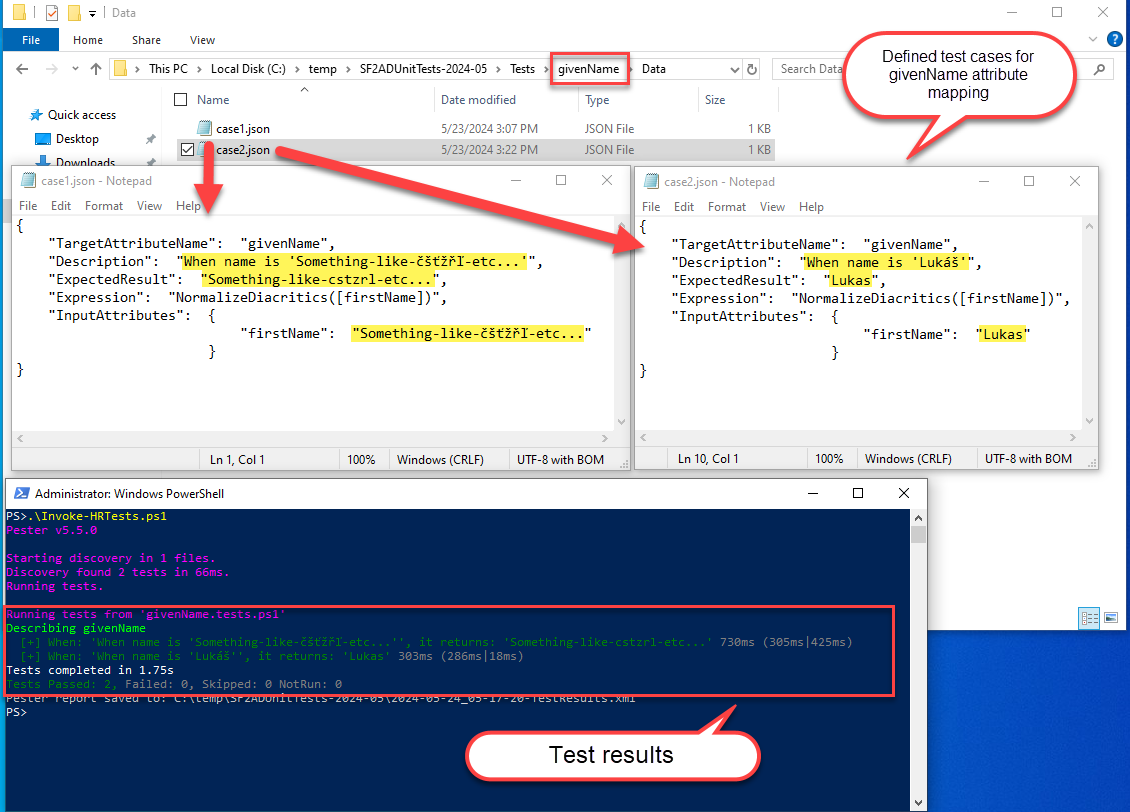
We’ll use a following directory structure of the test suite:
Invoke-HRTests.ps1
+---Config
| config.json
+---Tests
    +---givenName
    | givenName.tests.ps1
    | +---Data
    | case1.json
    | case2.json
    |
    +---sAMAccountName
    | sAMAccountName.tests.ps1
    | +---Data
    | case1.json
    | case2.json
    |
    +---sn
    | sn.tests.ps1
    | +---Data
    | case1.json
    | case2.json
    ...
In the test root directory Invoke-HRTests.ps1 file will be generated, this
file contains the basic functions for test invocation. It is responsible for:
- performing checks whether we are connected to MgGraph
- configuring Pester (container, output and results).
In the Config directory, a simple config.json file will be stored.
This file contains the servicePrincipalId and SynchronizationTemplateId needed
for executing
Invoke-MgParseServicePrincipalSynchronizationTemplateSchemaExpression. It also
includes HRApplicationDisplayName, which will be used to name the tests.
The Tests directory will contain a subdirectory dedicated to each attribute
specified in the HR provisioning flow. If you do not want to test a particular
attribute or synchronization rule, you can simply delete the corresponding
directory.
Each dedicated directory will contain a generated Pester PowerShell script named
<attributeName>.tests.ps1 and a Data subdirectory. The Data subdirectory
contains the JSON structures described earlier.
The Pester PowerShell script is straightforward. It loads all the JSON structures from the respective Data subdirectory, puts them into a hashtable, and runs data-driven tests.
In the tests
Invoke-MgParseServicePrincipalSynchronizationTemplateSchemaExpression is
executed and we are checking:
-
ParsingSucceeded- to determine whether the expression is syntactically correct. -
EvaluationSucceeded- to determine whether provisioning engine can evaluate the result. -
EvaluationResult- to determine if the result meets our expectations.
Following code excerpt illustrates the Pester PowerShell unit test:
Describe "%TESTNAME%" {
    # load the json testRuleData structures
    $testData=@()
    ls "$PSScriptRoot\Data\*.json" | foreach {
        $configObject = Get-Content -Raw $_.FullName | ConvertFrom-Json

        $ht=@{}

        $configObject.psobject.properties | foreach {$ht.Add($_.Name,$_.Value)}
        $tenantConfig=ls "$PSScriptRoot\..\..\Config\Config.json" | get-content -raw | ConvertFrom-Json
        $ht.Add("SynchronizationTemplateId",$tenantConfig.SynchronizationTemplateId)
        $ht.Add("ServicePrincipalId",$tenantConfig.ServicePrincipalId)

        $testData+=$ht
    }

    # for each test structure: test Parsing, Evaluation and Expected result
    It "When: '<Description>', it returns: '<ExpectedResult>'" -ForEach $testData {

        $propertiesHT = @()
        foreach($attr in $InputAttributes.psobject.properties)
        {
            $propertiesHT+=@{'key'=$attr.Name; 'value'=$attr.Value}
        }
        $params=@{
	        expression = $Expression
	        targetAttributeDefinition = $null
	        testInputObject = @{
		        definition = $null
		        properties = $propertiesHT
	        }
        }

        $retval = Invoke-MgParseServicePrincipalSynchronizationTemplateSchemaExpression -ServicePrincipalId $ServicePrincipalId -BodyParameter $params -SynchronizationTemplateId $SynchronizationTemplateId
        $retval.ParsingSucceeded | Should -Be $true -Because "PARSING must succeed to determine EvaluationResult."
        $retval.EvaluationSucceeded | Should -Be $true -Because "EVALUATION must succeed to determine EvaluationResult."
        $retval.EvaluationResult | Should -Be $ExpectedResult
    }
}
Tests generation and execution
Now that we have outlined our approach to testing, we can describe how to implement it in practice.
I’ve created a PowerShell module that wraps up the concepts described earlier and generates a test suite.
To use it properly, follow these steps:
- Install the module
- Generate the tests
- Modify the test JSON data structures
- Execute tests
Installation
You just need to install the PowerShell module from gallery. It is also
recommended to have PowerShellGet updated to version 2.2.5.
# update PowerShellGet (optional)
Install-PackageProvider -Name NuGet -Force
Install-Module PowerShellGet -AllowClobber -Force
Install-Module HRProvisioningTests
Test generation
To generate a test suite, you need to connect to MgGraph (to read the schema) and provide the HR Provisioning application display name and the output directory.
The output directory must be empty to ensure that existing test suites are not overwritten.
You can generate the test suite as follows:
Connect-MgGraph Synchronization.Read.All
New-HRProvisioningRulesTestSuite -TestSuiteDirectory C:\TEMP\SF2ADUnitTests-2024-05 -HRApplicationDisplayName 'SuccessFactors to Active Directory User Provisioning'
Modifying the test JSON data structures
As mentioned previously, the New-HRProvisioningRulesTestSuite generates a
test suite with a specific directory structure.
You need to modify JSON files inside the Data subdirectories to create your test cases. You can add as many JSON files as you need. If you believe you don’t need to test a particular flow just delete the entire directory (not only the data subdirectory).
{
    "TargetAttributeName":  "givenName",
    "Description":  "When name is 'Something-like-čšťžřľ-etc...'",
    "ExpectedResult":  "Something-like-cstzrl-etc...",
    "Expression":  "NormalizeDiacritics([firstName])",
    "InputAttributes":  {
                            "firstName":  "Something-like-čšťžřľ-etc..."
                        }
}
When you have modified all the necessary JSON or deleted the unnecessary tests you can continue with test execution.
Tests execution
To execute the tests run following:
# https://learn.microsoft.com/en-us/graph/api/synchronization-synchronizationschema-parseexpression?view=graph-rest-1.0&tabs=http#permissions
Connect-MgGraph Synchronization.ReadWrite.All
C:\temp\SF2ADUnitTests-2024-05\Invoke-HRTests.ps1

And that’s basically it. Test and deploy.
One final thing, the pester is configured to output the results as NUnitXml, so that you can generate fancy reports if you wish.