entra-id testing claim rules with jwt.ms
There are
several
ways to inject custom
claims
into tokens issued by Entra ID. Before diving into those details (may be in future ![]() ), today I’ll focus on how you can easily test
claims rules.
), today I’ll focus on how you can easily test
claims rules.
In this blog post I’ll describe how to use jwt.ms for testing claim rules in the OAuth2 implicit flow. To do this you need:
- Create an application registration in your Entra ID tenant
- Craft a redirect URL and test
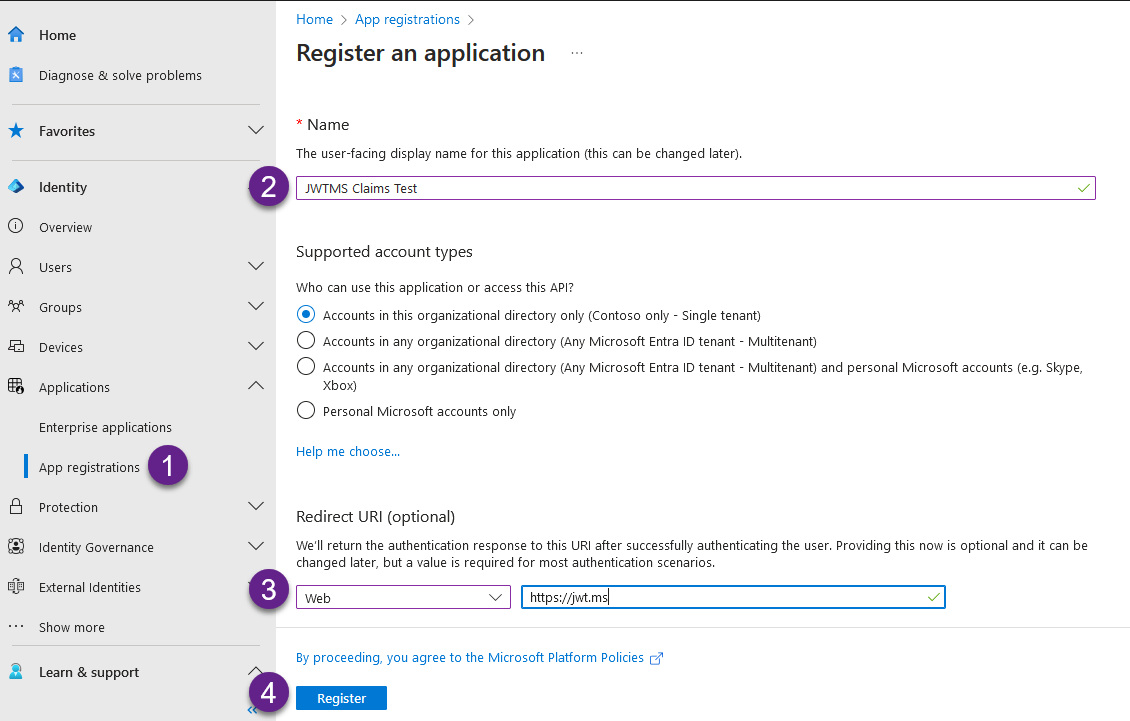
Creating an application registration
Creating an application registration is straight-forward:
- Navigate to
Entra Admin Center > App registrations > New registrationor use Merill’s cmd.ms, or go directly https://enappreg.cmd.ms/. - Choose a name for the application registration
- In
Redirect URIchooseWebandhttps://jwt.ms - Press
Register
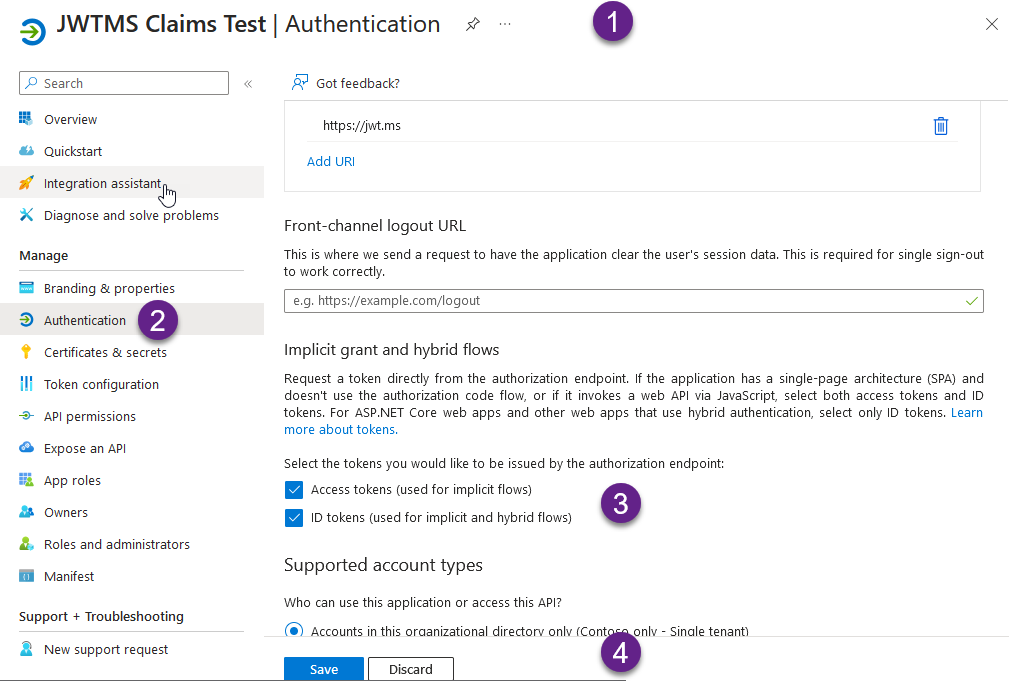
After the application is registered you need to enable implicit flow:
- Navigate to the application you have just registered in
App registration - Choose
Authentication - In
Implicit grant and hybrid flowscheck both:-
 Access tokens (used for implicit flows)
 -
ID tokens (used for implicit and hybrid flows)
-
- Press
Save
Now we can start with testing ![]()
![]() .
.
Testing claim rules and few notes on implicit flow
According to Microsoft identity platform and OAuth 2.0 implicit grant flow protocol diagram, the sign-in process should be initiated by application. This is illustrated by next picture, in the very first flow: SPA redirects user to sign in.

Unfortunately, we can’t force jwt.ms to sign you in via Entra, so we’ll need to use a small workaround. We will build the URL manually and use it to initiate sign-in.
According to the documentation, the following parameters are mandatory in the sign-in request:
- tenant
- client_id
- response_type
- scope
- nonce
Other parameters are optional, but we won’t dive into those details today.
| parameter | description |
|---|---|
tenant |
This is basically your Entra ID tenantId, you can easily find it either through Entra administrative center or for example via MgGraph.Get-MgOrganization | select -ExpandProperty id
|
client_id |
The Application (client) ID that was assigned during app creation previously. Either accessible via Entra administrative center or for example via MgGraph.Get-MgApplication -Filter "displayName eq 'JWTMS Claims Test'" | select -ExpandProperty AppId
|
response_type |
id_token for id_token testing.token for access token testing. |
scope |
A space-separated list of scopes. For OpenID Connect (id_token), it must include the scope openid, which translates to the “Sign you in” permission in the consent UI.Optionally you may also want to include the email and profile scopes for gaining access to additional user data. You may also include other scopes in this request for requesting consent to various resources, if an access token is requested. |
nonce |
A value included in the request, generated by the app, that is included in the resulting ID token as a claim. The app can then verify this value to mitigate token replay attacks. Since we are just testing claim rules we’ll use a constant 0xdeadbeef.Never, ever do this in a application you are creating. Ever |
To simplify the URL-building process, I’ve created a simple table that will help
you. Just fill in the necessary parameters, and it will automatically generate
the URL for you. The generation is triggered by onChange JavaScript event, so all you
need to do is click the Copy URL... button, and the correct URL is
generated.
At minimum, please provide your own TenantId and ClientId
parameters, otherwise it just won’t work ![]() .
.
| TenantId: | |
| ClientId: | |
| Response type: | |
| Scopes: |
And short video for the conclusion.
Rhymes with trapdoor solution
![]() .
.